HR Forms workflow report
Forms are submitted into workflow and routed to approvers through the HR-Payroll Inbox. The HR Forms Workflow Report is used to track and monitor the forms through the approval process.
- Enter information in one of the available fields:
- Process Name
- Process Status
- Start Date
- Process Initiator
- Personnel Number
- Organizational Unit
- Position Number
- Reference Number
- Processor
- Click Go.
- Highlight any of the returned results by clicking the circle to the left of the result.
- Click Details
The report allows users the ability to see several key pieces of workflow information:
- A list of all forms involving an organizational unit, whether as primary department, secondary department, or funding department.
- A list of all forms submitted into workflow (Results List)
- A current location and status of each form (Results List)
- The entire workflow route of the form from beginning to end (Details screen)
- A list of all organizational units involved in the approval process (Details screen)
- A list of all the individual approvers for each step in the approval process (Details screen)
- The contact information for each approver (Details screen)
- The details/data on a submitted form (Details screen)*
*Access to this information has not changed and continues to be role/processor dependent.
The report maintains data confidentially. Users can only open and view information contained in a form if they have initiated or took action (approved, rejected, withdrew) on the item. For managers who do not already have access to see their department’s forms, a security role can be requested via the IT Help (Information Technology) Request Access (eARM) form to have this ability added to their Net-ID login in EBS. The role to be requested is HR Reporting Admin and you must specify the Organizational Units that should be made viewable with a business reason to support this additional access.
Using the Report
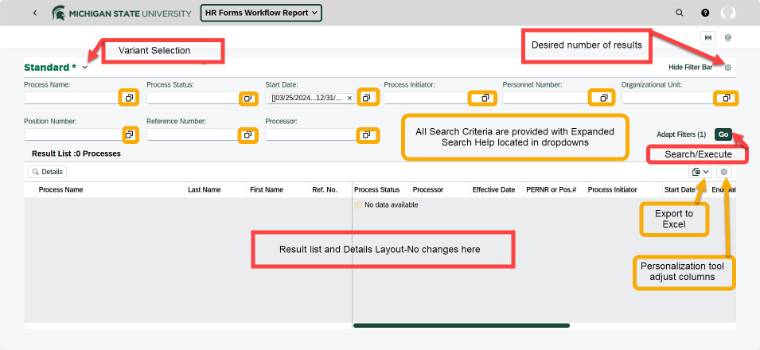
Search Criteria Layout
The report displays with all possible search criteria available. Process Name and Process Status search criteria fields have defined dropdown selections. Start Date can be defined as a single date or as a range and is set to initially default to 1 year prior to today. The remaining selections are blank or input fields which allow you the ability to enter or search for specific data to narrow the results. Multiples of each item can be searched at the same time.
Workflow Search Criteria
-
Process Name -
Search for all forms submitted for a specific process. Ex. FAS Change of Status, Student Hire. The search box pop-up provides an entire list of all available processes. Select one or more as needed.
-
Process Status - Locate forms that are in a status of: Draft, In Process, Error, Completed, or Cancelled. To search for forms that are in a particular status, open the selection pop-up and choose one or more of the statuses available.
-
Start Date – Start date refers to the date the form was submitted into workflow, not the effective date of the form. The report pre-populates with a date range of 1 calendar year prior to today’s date and an end date of 12/31/9999. Adjust the start date if searching for forms submitted into workflow more than a year ago. To do this, open the search pop-up box where 3 months of calendars will be displayed. If you wish to search for a single day, select the single day from the calendar. The single day will appear in the Selected Items area below the calendars. Remove the default date range by clicking on the circled x. If a new date range is desired, click on Define Conditions where optional operators are available in the dropdown and a new beginning and/or a new end date can be selected. Enter and the new date selection will appear in the Selected Items below for review. Make any adjustments needed, click OK and Go to execute your new search.
- Process Initiator - Enter the initiator's NetID in the blank field. If NetID is unknown use the search box to search for NetID by Last Name, First Name or partial NetID.
- Personnel Number - This search finds forms associated with the employee whom is the subject of the form, not the initiator of the form. If the Personnel number is unknown, the search box allows for a partial number or search by first or last name.
- Organizational Unit - Enter the organizational unit number or open the search box to obtain the number by department name. Combine with other search criteria to reduce results.
-
Position Number – Use the position number search criteria to find forms associated with postings. A position number always begins with the number 3. A Position number search requires exact position number for entry on the initial search screen. If the full position number is unknown, use the Search box pop-up and enter the name or partial name of the position with an asterisk (*) to locate a full position number.
-
Reference number - Enter the full Reference Number in the blank field. If the full number is unknown, use the Search box pop-up. If a partial Reference Number is known, a wildcard search may be done using an asterisk (*) with the known data. The Process Name is also available to help reduce the results of the search.
-
Processor -A processor of a form, is anyone who has taken action on a form. Entering an employee’s Net-ID in the available form will display all forms the employee has submitted, rejected, or approved. Use the search pop-up box to search for the processor’s Net-ID by last or first name, or partial Net-ID with an asterisk (*).
Additional Search Criteria
Additional Search Criteria selections are available to assist with a more defined search of forms submitted into workflow. The additional search criteria can be selected by opening the search pop-up box and then clicking the Define Conditions tab. By using the search field and operator “is” or “is not”, the results can be narrowed to more specific results. Multiples may be used.
Excluding Criteria
The ability to exclude specific search criteria is also available inside the Define Conditions tab of each search criterion inside the search help pop-up box. Select the search help boxes, click on Define Conditions and then Add Criteria To Exclude. Enter the items you wish to be excluded from this search. This functionality will be helpful when searching for all forms submitted except certain types of forms or other criteria. For example, to find all the forms you've submitted except the termination forms, you would place your name in the Process Initiator field and then Exclude from Results the Process Name of Termination.
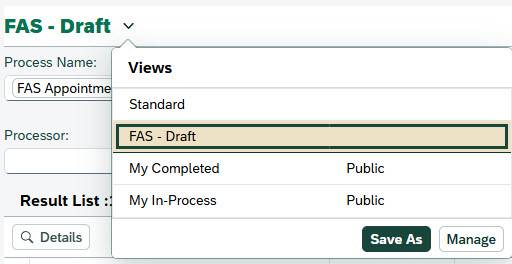
Saving a Search/Variant
The report allows for the ability to save searches for future use. Therefore, if a search will be performed repeatedly, it would be advisable to save the search. To save a search, define each search field as desired. Once all the desired fields are defined, click Go.

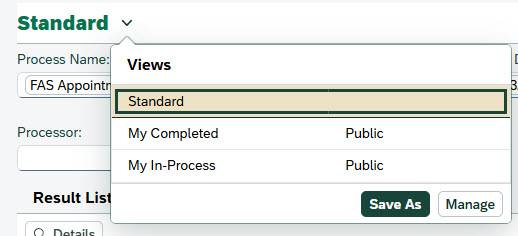
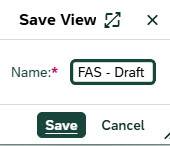
To save the variant, navigate to the saved Varirants drop down and click Save As.
In the pop-up box, provide a name for your new search and click Save.
The saved search can then be accessed from the saved Variants drop down.
If you need to update your saved variant, select the variant from the dropdown and allow it to populate the search fields. (Public variants are not editable.) You can make temporary adjustments and run the search by selecting GO. For permanent changes, update the search fields as desired and select SAVE. A confirmation message will appear at the top of the box.
![]()
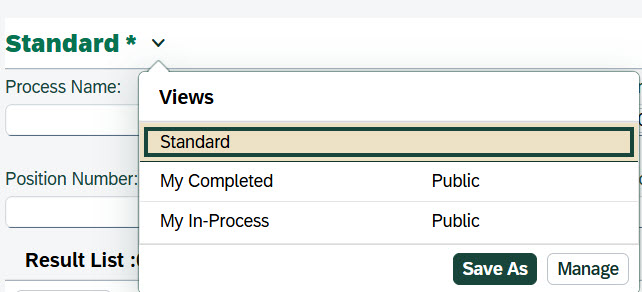
Default Global Variants
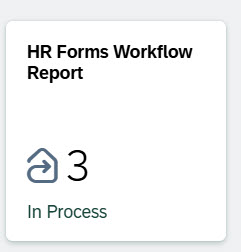
By default, the report will contain two global variants within the saved searches dropdown. The global variants are My In-Process and My Completed. Both variants will capture the user login credentials to populate the processor field along with the process statuses to retrieve the appropriate results. Additionally, the tile for the HR Forms Report will display the number of forms that are currently in-process for the logged-in Net-ID.
My In-Process
The My In-Process variant auto-fills the Process status as Draft, In Process, and Error, the Processor by logged in Net-ID, and removes the default date range of the Standard search.
My Completed
The My Completed variant auto-fills the Process status as Completed, the Processor by logged in Net-ID, and removes the default date range of the Standard search.
The Global Variants can then be accessed from the Variants drop down.
Optional Selections
By default, the report will only return a maximum of 100 results. To view a specific amount, change the number in Limit No. of items to: and click OK.

Report Results
Once the report is executed, the report results are displayed.
By default, the Results List displays the following information about each returned result:
- Process Name - Title of the submitted form
- Last Name* - Last name of the employee for whom the form was submitted
- First Name - First name of the employee for whom the form was submitted
- Ref. No. - The reference number of the submitted form
- Process Status - The current status of the form within workflow
- Processor - Either the person completing or the next available approvers of the form
- Effective Date - If approved, the date the resulting action will occur
- PERNR or Position # - The employee's personnel number or the position number of the posting
- Process Initiator - The Name of the employee who submitted the form
- Start Date - The date the form was submitted into workflow
- End Date* - The date the form completed workflow, either by final approver or by cancellation
- Business Status* - A Central HR defined status of a from within the Central HR inbox
- PSA - The Personnel Sub Area of the employee
- ESG - The Employee Sub Group of the employee
- Object Type - The application type of the requested form, either Person or Position
- Action - A cod classification of the type of action being processed in the form
- Error Description - Optional - Should the form error during workflow, a brief indicator will be provided here
*There may not be data to populate these fields depending on the search criteria entered. To add, remove or change the column order and/or defaults, click the Settings button, make the desired changes and Save.
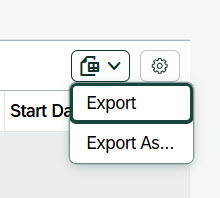
Exporting to Excel
The Results List can be exported to Excel as needed, by selecting Export. All columns that are displayed at the time of initiating the export will be transferred to Excel. Use the Settings menu to make any adjustments to the results data before exporting.